Whether it’s going on your site, social media, or marketing materials it’s important to make your business look its best. Business owners who don’t have the budget for professional photography often times resort to their cell phone for images and with the drastic improvements in camera phone technology this isn’t as bad of a thing as it used to be. In this article we’re going to take a look at a few different ways to get the best picture you can out of a cell phone without spending a cent.
Tip #0.5: Use The Best Camera You Have
We’re not counting this one as a real tip though it might help some of you. Even if all you have access to is a cell phone not all cell phone cameras are created equally and it goes beyond just finding the camera with the most megapixels. A lot more goes into making an image look great than just the resolution it’s shot at. . We recommend that you take a look at DxOMark.com and compare the rating of your phone camera against everyone else’s that you might be able to use and once you’ve found the best one always use that camera.
Tip #1: Get On ‘Eye Level’
Now, your products don’t exactly have eyes, but they do have an eye level. When most people take pictures of their products they take the shot from standing height pointing down. This makes the product look tiny and the whole image becomes flat. Your best bet is to get on the same level as your product and fill the frame as much as you can. Let’s take a look at an example using my cellphone (A Google Pixel XL) taking a picture of the camera that I actually use for our professional photography (A Panasonic GH4).
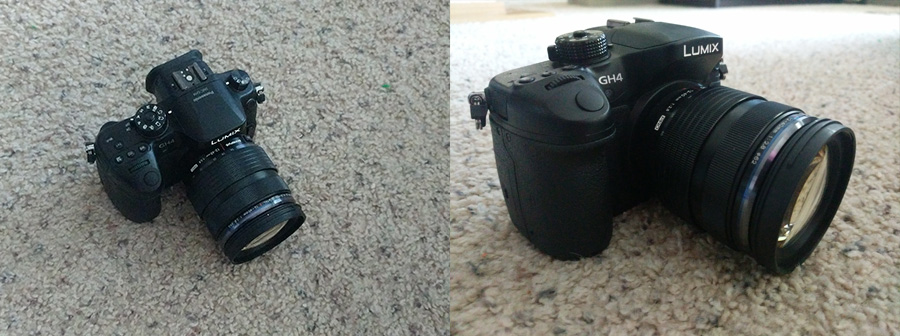
These two pictures were taken on the floor with no post processing and all of the fancy features of the camera turned off to try and get the most accurate representation of what they might look like on lower end cell phones. It’s still not the quality that you would get from using a dedicated camera and lighting system but the difference is clear and it goes to show that a single small change can make a world of difference in a picture.
Tip #2: Head Towards the Light
… And not in a dark tunnel bright light kind of way. It’s important to keep in mind that even though cameras in our cell phones keep getting better they’re still restricted by the size of the phone. The camera sensor is what gets hit by the light coming through the lens and makes the image. The smaller the sensor the more light you need to make an image look good.
What this means in a practical sense is that when you’re taking pictures you need to make sure that you’ve got enough light. This could mean bringing in additional lights, taking your pictures by windows or glass doors or even taking them outside. Whatever it takes to get your product covered in light. Let’s take a look at what opening and closing one set of blinds can do to an image:
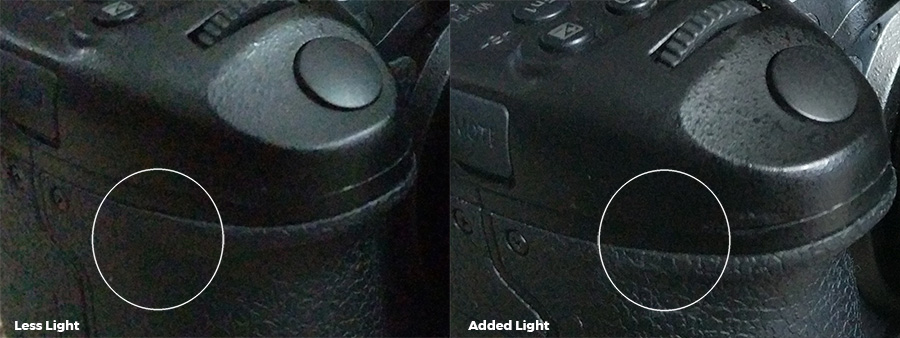
Notice on the left image that there’s a lot more grain and you can even see the black grip material is starting to get purplish splotches. This comes from your camera trying to compensate for the low light by cranking up a setting called ISO. Which basically tries to take the small amount of light hitting the sensor and multiply it. Just like when you turn a speaker up too loud you start to get distortion. The only way to avoid the ISO getting lifted is to provide more light to the sensor so bring in lamps, open blinds, and light candles if you have to!
Tip #3: Use Portrait Mode and HDR
The latest technology to hit smartphone cameras is ‘Portrait’ mode and slightly older than that is HDR. Let’s take a look at what each of these features do:
Portrait Mode
The earliest version of portrait mode was called “Lens Blur” and it was released back in 2014 by Google. It worked by taking a picture, lifting your phone slightly and then the software on your phone would scan the image, identify the subject and the background and apply a blur effect to the background to simulate the way higher end DSLR cameras take photos. The software has continued to evolve and now Google, Apple, and most other phone manufacturers have their own variation of the technology. Some use two separate cameras to take an image and compare them, while others use more complex sensor technology or software. In our testing Google’s more polished software and hardware solution gives better results but the feature performs well on all platforms.
Here’s a look at what it can do for you:
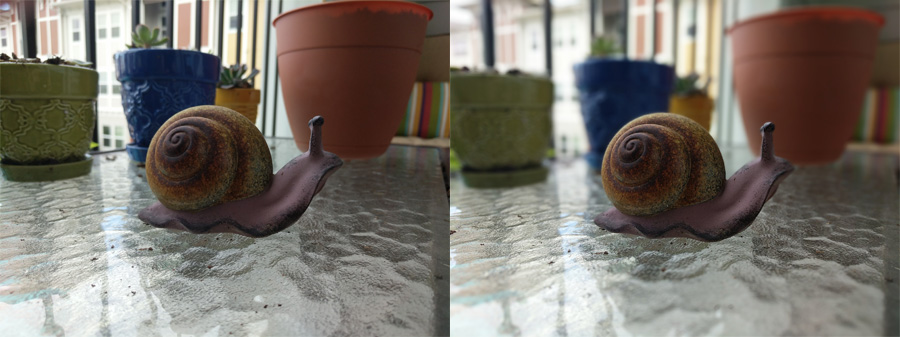
This is a subtle effect but one that adds an extra level of style to your images that won’t go unnoticed. The picture on the left doesn’t look bad, but you can see a lot more of the background in focus which distracts the eye from the core subject (my favorite fake garden snail). The photo on the right draws your attention immediately to the center because the rest of the image is blurred and therefore there’s less things competing for your attention.
HDR
HDR stands for High Dynamic Range and you might have started to see it advertised on new televisions and on Netflix as well as other streaming platforms. What it means for you is better colors, more contrast, and better pictures even in low light situations. It works by rapidly taking multiple photos and then combining them into a single image. Since it takes multiple pictures and combines them this doesn’t work very well with fast moving subjects like a football player on the field or your cat chasing a toy. Thankfully most phone cameras are smart enough to tell what you’re taking pictures of and turn off the feature if it doesn’t think it will work well. The images above were all taken without HDR.
Let’s take a look at the results you can get with HDR turned on. This will be using the same phone as above and all settings and lighting will be exactly the same except in one HDR will be turned off, and on the other it will be turned on. To really show the differences I’ll be using a plant on my balcony at home as an example because it represents a pretty common use case where you’re outside, it’s extremely bright but you still want to be able to see the sky and the subject of your photograph.
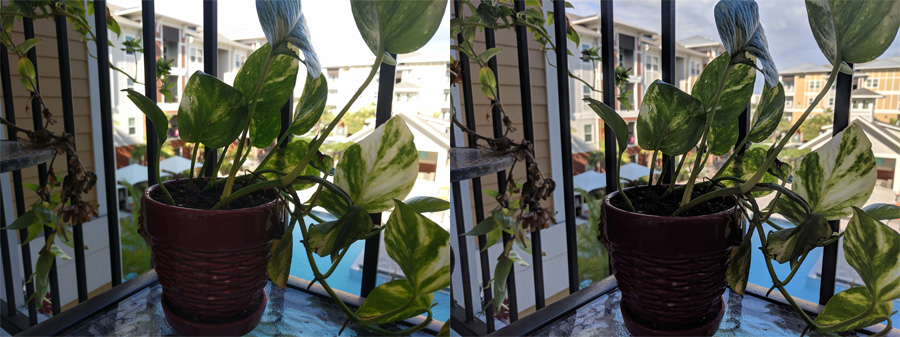
I was honestly surprised at the results of this test. You lose almost the entire sky and all of the shadow detail in the left image which was taken without HDR and with it you get the full range of color of the plant and can see the slightly stormy clouds that are beginning to form (thanks Florida weather!).
Finally
Keep in mind that you want to be on eye level with your subject, the importance of getting enough light and all the new technology that you can use to help improve your pictures and you’re sure to get better results which will make your business look more professional and your services and products more appealing.
If you’d like to talk with us about getting professional photography done for your business we’d love to hear from yo. If not then I hope you’ve enjoyed this post and that it helps you to get better pictures of your products, your employees, and your services. If you’ve got any questions at all feel free to get in touch with us below and if this has whet your appetite and you want to know more tips and tricks be sure to let us know as well!