What Does It Do?
The multi-marker Beaver Builder module takes a custom post type with a location field and generates a map with a marker for every post within that post type. It also lets you apply custom icons to each marker based on the posts category and provides a filtration system so your site’s users can see only the markers that are relevant to them. If you like the sound of any of that then please give it a try and if it’s not quite what you need it to do feel free to get in touch and we’ll see if we can integrate it into the module or create a variation. If you’re a programmer and are interested in changing it yourself you can feel free as it’s freely licensed under the GPLv2 and available on GitHub..
Getting the Plugin
You can get it on the WordPress plugin repository here.
How to Use It
ACF Users
Just create a field using the jQuery Google Maps location field.
Pods Users
It’s a little bit more complicated for Pods users but following this method you’ll no longer need to install ACF just for its location field. It will take an extra field on your pod though. You need to create a field that will take an address and another field that will store GPS coordinates. With those fields made now you will need to add some code to the functions file of your theme.
I’ve created a generator at the bottom of this page that you can use to generate the code. Major props go out to this post on LowGravity.pl for the example. You can also go there and follow those instructions instead if you’d like. This code basically takes the address field that you’ll fill out, pings Google to get the GPS coordinates which it then places in an uneditable field that the multi-marker map module can see.
With that out of the way, let’s look at some settings!
The settings are as follows:

Required Information
Content Tab:
- Source – This should be set to custom query unless your post type is just the standard WordPress Post
- Post Type – Select the post type that has the location info
You can then set up any additional offsets and filters as you normally would.
General Tab:
- Location Name – Here you’ll need to enter the field name for the title of your marker. If you don’t enter anything it will default to the standard WordPress Title field.
- Location Field Name – Here you’ll need to enter the field name that was given to your location field in ACF or if you’re a Pods user the field that is autopopulated with the coordinates by the filter you set up above.
- Description Field Name – Enter the field name that has the description you want to appear in the InfoWindow when a location is clicked on. Defaults to the standard WordPress content field.
- Zoom Level – Enter the zoom level for your Google Map, defaults to 10
- Center Latitude – The latitude for the center point of your Google Map.
- Center Longitude – The longitude for the center point of your Google Map.
- Google Maps API Key – Your Google Maps API key to enable use of the map.
Optional Settings
- Use Category Filter – Select whether you want to include a section for filtering by category beneath the map
- Use Custom Icon – Select if you’d like to use custom icons based on the category of the post
- If you select yes then you must fill in the Icon Field Name which is just the name of the field you assigned to the category to hold the icon image and the CPT Taxonomy Name which is just the taxonomy associated with your custom post type that has the icon field.
- CPT Taxonomy Name (Required if using either of the above options) – The name of your custom taxonomy that has all of your custom post types categories in it. For us this was ‘business_categories’ that had a variety of categories like ‘Gym’, ‘Martial Arts’, etc.
- Show Marker Radius – This puts a circle around your markers for a given amount of distance. You can set the radius for all markers with the Radius in Miles field, or get the radius on a post by post basis by giving the Radius Field Name the field name of your post type that has the radius information. You can also adjust the color of the circle and its outline with the Fill Color and Stroke Color color pickers. You can also adjust the thickness of the outline with the Stroke Weight option.
Screenshots
-
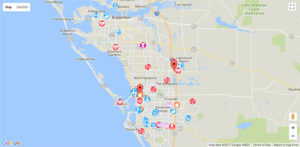
- Map with some custom icons and filtration

-
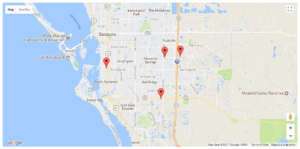
- Map demo with stock icons and no filtration.
-
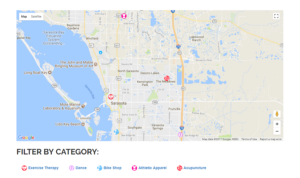
- Map demo with custom icons and filtration
Get In Touch